|
|
| |
|
| |
Learn thru webinars |
|
| |
The whole world can learn for free.
Learn, access our presentations, access our elearning content and take online exams.
|
|
|
|
|
|
| |
|
| |
|
| |
|
 |
 |
| |
Companies create project groups to serve their customers. A project consists of a group of users who perform various activities, in a given timeframe. You can track multiple projects in QAMonitor.
|
|
1. Login as eadmin.
2. Go to Settings page.
3. Click on Project Management
4. A grid will appear that shows a list of projects.
5. Click on New Project. A new window will open.
|
|
|
|
|
|
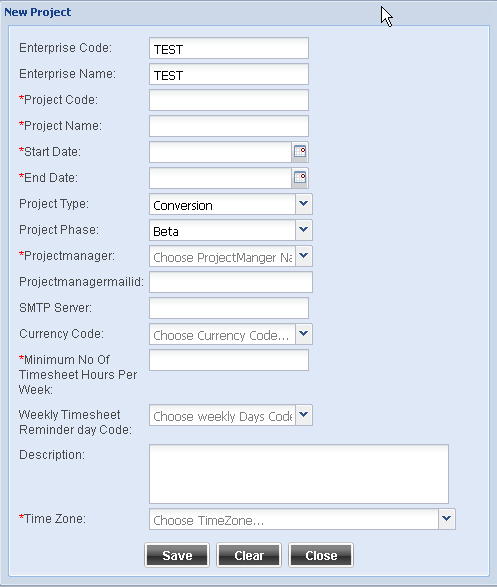
Enterprise Code - This is pre-filled by the system. It shows the enterprise code to which you have logged in.
Enterprise Name - This is pre-filled by the system. It shows the enterprise Name to which you have logged in.
Project Code - You need to fill in the code here as per your company format for the project code. Different companies use different formats.
Project Name - You need to fill in the Name of the project.
Start Date - This is the project start date. Use the calendar icon to open calendar and select the start date.
End Date - This is the project end date. Use the calendar icon to open calendar and select the end date.
Project Type - Choose appropriate type from the list box.
Project Phase - Choose appropriate phase of the project.
Project Manager - Choose user name from the list box who will be the project manager for this project
Project Manager Mail Id - This will automatically populate the email id of the project manager.
SMTP Server - Give the mail server name or IP address for sending the notification emails
Currency Code - Choose the billing currency code for the project from the list box.
Minimum number of timesheet hours - Enter how many hours people need to log per week for this project. Usually people do 40 hours a week.
Weekly Timesheet reminder day - QAMonitor can send auto mails as reminder. Choose the day on which it needs to send reminders for timesheet if not filled in.
Description - Detailed text to describe the project.
Timezone - Choose the timezone in which the date and time must be displayed for the project.
Save - Once you had given all necessary data to create project, click on Save button.
|
|
|
Edit Existing Project
|
| |
1. Login as eadmin.
2. Go to Settings page.
3. Click on Project Management
4. A grid will appear that shows a list of projects.
5. Click on the pencil icon that appears against the project that you want to edit.
6. A new window will open with the project details.
7. Project code cannot be changed. All other fields can be modified.
8. After modifying the details, click on Save button.
|
| |
|
| |
| |
|
|
|