Manage Defect Status Cycle
Tracking the bugs from new to closure is the core process in test management. Each company and each project has its own tailor made workflow to track bugs. QAMonitor provides the flexibility to configure the status transition of bugs.
- Login as project admin.
- Go to settings page.
- Click on Issues Cycle.
- A new window will open.


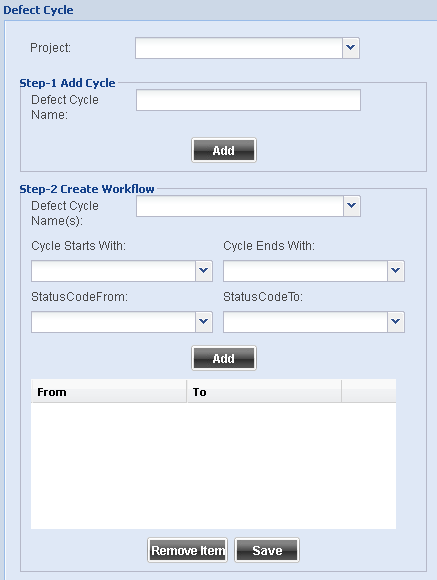
Select the Project from the project list box.
Enter a new Cycle Name and click on Add.
Step 2.Select the newly added Cycle Name from the list box.
Choose the Starting Status for the cycle.
Choose the nding Status for the cycle.
Choose the Status Code from.
Choose the Status Code to.
Click on Add. You will see the from and to status codes in the grid below.
Repeat adding all such status transitions. E.g. New to Open, Open to Fixed, Fixed to Retested, Retested to Closed etc.
After all such transitions are added, click on Save.
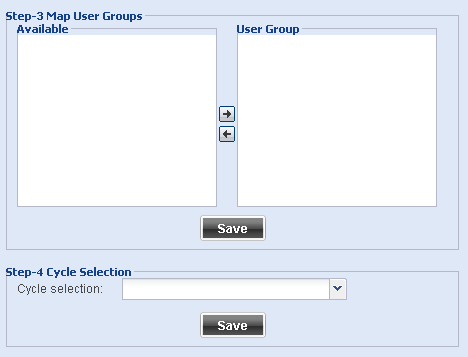
Step 3.From the transition grid, select a row.
On the right hand side, you will see available user groups of the project.
Select which user groups can change the status as per the transition group and move to the User Group box.
Example. Fixed to Retested status can be done by Tester and Test Lead user groups.
Click on Save.
Repeat this for every status transition. You need to save this for every status transition.
Step 4.Select the newly added cycle from the list box.
Click on Save.
From now on, this cycle will be in effect for the project.
Set Email Notification Rules
In a distributed project environment, users need to be notified on any activity on bugs. This is very essential when the status is changed. A status change makes another person to temporarily work on the bug. QAMonitor provides an easy way to set the status change email notification rules.
- Login as project admin.
- Go to settings page.
- Click on Issues Cycle Email Notification Rules.
- A new window will open.

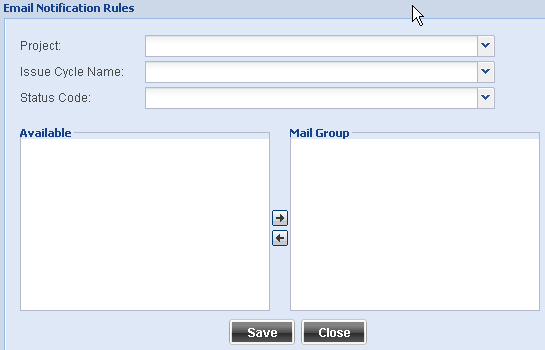
Select the Project from the project list box.
Select the cycle name from the list box..
Select the status code from the list box. When a defect reaches this status, the email will be triggered.
A list of available user groups will display at the bottom.
Select the groups that must receive the email when defect reaches this status; move it to the mail group using the arrow.
Click on Save.
Repeat the process of selecting status and assigning mail groups and save for every such status.


