


Manage User Defined Fields
User Defined Fields are the screen fields that are NOT pre-loaded in QAMonitor screens. QAMonitor displays its screens with field labels as per the most used industry nomenclature. But different companies use different data fields to capture data. The users prefer to see those fields as per their company norms. QAMonitor provides such flexibility, to add new fields on the fly.
- Login as eadmin
- Navigate to Settings page.
- Click on System Defined Fields. A new screen will appear.
- Select a project from the list box.
- Select a data entity from the Fields For list box.
- A set of new fields will appear in a grid below.
- Click on Create Field(s) button. A new window will open.
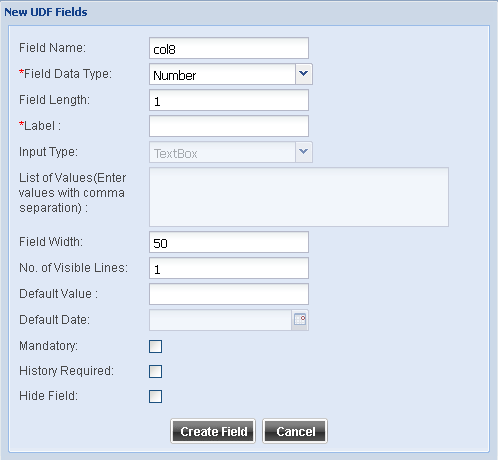
Field Name Give a unique name of the new field.
Field Data Type - This can be Number, String or Date.
Field Length - Number of characters the field must have for data storage.
Label -The name of the field that must appear on the screen.
Input Type - Choose from the available values. This is applicable when field type is string.
List of Values - A comma separated list, if the input type is selected as combo box. e.g. If we want to create a field called Browser with values FireFox, IE, Chrome, give these values as a comma separated list.
Field Width - Number of pixels for the field width.
Number of visible lines - This is applicable for multiline text box only.
Default Value - The value that must automatically appear on the field.
Default Date - The value that must automatically appear on the field. This is only for date type field.
Mandatory. If this is checked ON, the field will be treated as mandatory field on screen with a red star. User must provide data.
History Required. If this is checked ON, the field values will be stored in history tables whenever they are changed.
Hide field. If this is checked ON, the field will not appear on screen.
Click on Create Field to save the data.
- Settings Main Page
- Lookup Codes
- Hosts
- Activity Types
- User Defined Fields
- System Defined Fields
- Change Password
- Set Timezone
- Defect Cycle